Monday, January 30, 2012

Cute Flower How-To and a Giveaway!

And the winner is.....
Comment #6- Sweet P's Cookies.... Congratulations!


What a busy week!  
I wish it was because I was busy baking, but alas, it was not. I drove 6 hours with my 3 boys, 5 and under, to help my mother-in-law move. Then drove 6 hours back within 24 hours. Don't you wish you were me? Seriously, I love my mother-in-law, but that car ride was, well, there is just not words. My awesome sister-in-law showed up with a Venti Caramel Macchiato, I think I gave her a hug before I tore that liquid sunshine out of her hands. 
She understood.
Meanwhile, I managed to squeeze a cake in before we left. I was asked to make a birthday cake and was given creative liberties. Love that, especially when I want to try a few new things.
I saw a beautiful cake on CorrieCakes with cute little flowers on top. I had to to try them! I thought you might like to try them too, so I will show you what I did, then give you the tools you need to make them. Exciting! This is my first giveaway and I am super excited. I am new at blogging and probably doing it all wrong, but hey, I'm having fun and that is really all that matters.


First, the cake.


These flowers were so fun to make, I'll show you what I did.


Cut out some small circles.


Cut out a medium white circle, this will be your base.


Take one of the colored circles and press a bit with your thumb. In hindsight I probably should have painted that ugly nail. Sigh... not enough time in a day. Well, try to look past it and focus on the flower. 


Next, start placing them around the edge of the white base. I placed them on first then went back and "glued" them on with Royal Icing. If you don't want to make icing you can dab a little water on them  to stick them, up to you.


Place another layer of the small circles.


Then top with a different color circle. Easy right?


You can use different colors, layer them, just go crazy.
Crazy is encouraged here.


After making this cake I started thinking.... Maybe you would like to make these flowers and cute little dots too. It is not difficult, just a little time consuming.
It just so happens I ordered a small cake decorating set because I needed some of the items in. It also had a set of circle cutters. Exactly what I used to make these flowers and dots, however, I already have them. Sure I could just keep them for myself, but what fun is that. I can give them away to one of the awesome people who actually come here and read my blog. It is something small to say thank you and encourage you to give decorating a chance. These cutters are also great for cutting out sugar cookies. But Wait! There's more. I was at the store browsing for some home items when I came across the cutest cutting boards. Best part is they were on sale! I got one of course, but I got another one to give with these circle cutters. 


Yes, it's a cutting board. Super cute! The giveaway starts now and will end on Feb. 2nd at 5pm. I will choose the winner using Random.org.


Here is how you enter:


Required entry: Leave a comment letting me know what your favorite cake flavor is.


Additional entries:
1. Follow my blog, leave a comment that you do.
2. Start following me on facebook here . Leave a comment letting me know that you did. 


You can leave your email if you want or I will post the winner here and how you can contact me.
I apologize, but this giveaway is only open to U.S. residents.
I am doing this independently and am no way endorsed by Wilton.


Thanks for reading!


Baking from my heart to your kitchen,



Tuesday, January 24, 2012

Cherry Chocolate Cookie

I should title this post, "The Cherry Cookie that made me want to cry".

You know they say, "When life gives you lemons, make lemonade" well, I would rather make a lemon chiffon cake, but that's just me. Keep that quote in mind though.
 I had some maraschino cherries I had to use in the cupboard, so I decided to make some cookies. Also, after  polling my fabulous facebook fans on their favorite chocolate I had to use some milk chocolate. I settled on some Dove chocolates because they are in cute little chocolate hearts for Valentines' Day. I had an idea and after some researching I found a cookie recipe I wanted to try. I found it on chickensintheroad.com, go ahead and check hers out, because they look nothing like mine. Hers are all pretty and mine, well, flattened. Sigh...


You know those lemons I talked about, I was handed some, in the form of flat cherry cookies. What to do?..


Here is what I ended up doing to save my poor little cookies.


You will need:
1 cup butter, softened
1 cup powdered sugar
1/8 teaspoon salt
2 teaspoons maraschino cherry liquid
1/4 teaspoon almond extract
 2 1/2 cups all-purpose flour
1/2 cup chopped maraschino cherries
1/4 cup sugar
Dove milk chocolates


Preheat the oven to 325 degrees
Cream the butter
Add the powdered sugar and mix to combine.


Add the cherry juice and almond flavor, mix to combine. I also added 1 tsp of red food coloring at this point to get a deeper red.
Slowly stir in the flour until combined.


Chop up some cherries, this is messy, as you can see. 
Add these to the batter until combined.


Roll into balls and then roll them in some sugar.
Place on cookie sheet. The first batch I pressed down with a cup, but the next batches I left in balls.


When they come out of the oven, press the chocolate in the middle, but mine look so sad. When things like this happen, I just want to grab the whole bag of Dove chocolates, crawl under the table and eat them all. By the way, that is what I found my 2 year old doing later. He read my mind! After holding back the tears, I had to try to do something with these sad little cookies..sooo....


I decided to sandwich the Dove between two of my flat cookies. Please look past my horrible nails, for some reason I can't use red food coloring without getting all over me. An occupational hazard.
Meanwhile, I tasted the cookie....


To my surprise they were very tasty and I don't even like maraschino cherries. I tried another one just to make sure and yes, tasty indeed!

I did decide to add some more flour to the batter to try to stop the flattening. It worked a bit so I was able to make some pretty ones.


At that very moment my sons were playing with playdough and some cookie cutters. That gave me an idea. I grabbed my heart cutters and cut my sad cookies into heart shapes. Still not very pretty, so I drizzled some white chocolate on top.
Take that lemons!

They still aren't the prettiest of cookies, but the  important thing is they taste good.
That's what I keep telling myself anyway.


Saturday, January 21, 2012

Simply Saturday: Waffles

Every morning my husband gets out of bed before me and it's usually because one of our boys wondered in and woke us up, but regardless, he gets up first, wonderful man. If that is not awesome enough, he also starts the coffee. Awesome times infinity! Yeah, we could purchase one of those programmable numbers, but why? It's his way of waking me up in the morning. When I smell that liquid sunshine brewing I feel loved and ready to face the day.


What does that have to do with waffles? Well I'll tell you. It is my husbands favorite breakfast. When I am feeling extra loving or when the kids wake us up way too early, I will make Waffles.
The great thing about these is that you can freeze them in a ziploc and eat them for another breakfast, lunch, dinner, whenever, doesn't matter. They freeze well and toast up nicely. Watch out Eggo! There's a new waffle in town.


You will need:
2 cups flour
1 tsp salt
4 tsp baking powder
2 Tbls sugar
2 eggs
1 1/2 cups warm milk
1/3 cup melted butter
1 tsp vanilla extract


In a large bowl, mix together the dry ingredients, set aside. Preheat waffle iron.
In a separate bowl, beat the eggs. Stir in the milk, butter and vanilla. Pour the milk mixture into the flour mixture; beat until blended.


Ladle the batter into a preheated waffle iron. Cook until golden and crisp, or when your waffle iron says they are ready like mine. (the little lights goes off)


Serve immediately or freeze for the next waffle craving.


Baking from my heart to your kitchen,


Friday, January 20, 2012

Healthy Dinner Challenge

Let's face it, one question we get asked almost every day, "What's for dinner?"

Maybe you are the type of person that sits down at the beginning of each week and lovingly writes out a meal plan.You always has the right ingredients for every meal and your family rises up and calls you blessed.
You are my hero. One day, yes one day, that will be me, but for now when I get asked that question I think...
Oh Snap! Dinner!

This week, however, I was determined not to look in the freezer an hour before dinner and wonder what to make. I was not going to look in the pantry and pray a magic fairy appears with a brilliant idea for dinner. I decided to challenge myself. Make a healthy dinner without a can of cream of whatever soup, no sour cream, no cheese. A balanced meal with little fat and very tasty.

I only determined to do this one night a week, baby steps, let's not get too crazy.

Challenge accepted.... here we go...

I started with dessert, really? would you think any different of me.
A fresh fruit parfait of sorts.

You will need:

Plain yogurt (I used one small container of Chobani)
1/4 cup honey
1 tsp. vanilla
Fresh fruit 
(I used apples, grapes, clementines and bananas)
nut of choice (I used pecans)
Juice from a lime


Use whatever fruit you have on hand. You could also use Chobani's vanilla and honey yogurt. I thought about that after the fact, but I look forward to using it in the future.


Peel and slice the fruit and squeeze some lime juice on it.


Mix the yogurt, honey and vanilla.


Add the yogurt mix and nuts, then stir to combine.


There you have it! A healthy dessert.

Let's move on to dinner.


Grilled chicken, baked asparagus and "ranchified" red potatoes

I didn't get pictures of the chicken, because let's get real, chicken is not very pretty
I put the chicken in a large ziploc bag and poured low-fat italian dressing over them. Place in the fridge to marinate. Do this step in the morning and let it marinate all day.
Next week I will try a homemade marinade, baby steps remember.

For the Ranchified Red Potatoes you will need:

1-2 Tbls Olive Oil
Dry Ranch Dressing packet
Red Potatoes


Preheat oven to 425 degrees
Slice red potatoes into cubes and place on cookie sheet. Pour on the olive oil and toss to coat.
Sprinkle on the Ranch packet (I only used half the pack) and toss to coat
Bake for 20-25 minutes

While that's cooking work on the asparagus
You will need:
Asparagus
Olive Oil
Salt and Pepper
Slivered Almonds


Chop the ends off and place in shallow pan. Toss with some olive oil, salt and pepper to taste and sprinkle on some almonds.
Bake at 425 degrees for 10 minutes.

Back to the chicken. 
I took some fresh Rosemary, Red pepper flakes and some of the Italian dressing and made a paste. Spread it on the chicken and grill it for about 20 minutes, depending on the size of your chicken.
If you have a fabulous husband like mine. Just hand the marinated chicken to him and he will grill it for you.


Challenge Complete!
It was all very tasty, even my boys ate it with minimal complaints.That is saying alot seeing as one of my sons has an aversion to anything green on his plate and the other son doesn't care for chicken. The rule here is you have to taste it before you can say you don't like it. I would say it was a success.

I hope you get inspired to try something healthy too.
If you do please come back and tell me, I could use some more ideas.

Cooking from my heart to your kitchen,


Monday, January 16, 2012

Military Cakes

If you have read my blog at all you know that one of my favorite places is our church.
I truly look forward to going to every service and other activities there.
One of the ministries we have is the "Yellow Ribbon Ministry". It supports and honors the military in our church and community.

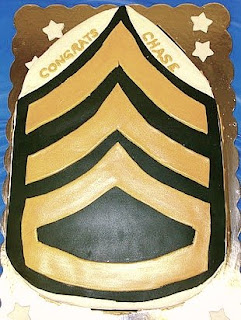
A friend of ours is in the Army and he was recently promoted to a new rank. The Yellow Ribbon ministry asked if I would make a cake to honor his promotion. Of course!

Here is what I came up with.......


I apologize for the pictures, but the lighting was a bit off and I forgot my camera. One of my friends graciously took some pictures for me.

I also have two brother-in-laws that are former Marines.
Here are two cakes that I have made in their honor..... Hoorah!


My father-in-law was a civilian in the Navy and then worked in law enforcement.
Here is a cake made in his honor.....


He loves mowing his lawn, so I incorporated his law enforcement logo and his lawn to make
"Lawn Enforcement".


I greatly appreciate all the work and sacrifice of our military.


Thank you for your service!


Baking from my heart to your kitchen,


Saturday, January 14, 2012

Simply Saturday: Blackberry Brownie Bites


I know I recently posted about blackberries, but I had to use up the rest of my blackberries.
I made some blackberry buttercream and tried to put it on cupcakes, but it was a strong blackberry flavor.
I needed a strong chocolate flavor... sooo.... I found a recipe for double chocolate brownie cookies in a cookbook I have. I was sold on double chocolate. Yum.

You can really put whatever you want in the middle of these brownie bites, I just used my buttercream, but the possibilities are endless... endless I say!

You will need:

2 cups semisweet chocolate chips
4 Tbls butter
1/3 cup unsweetened cocoa powder
2 eggs
1 tsp vanilla extract
3/4 cup sugar
1/4 cup AP flour
1/4 tsp baking powder

Preheat oven to 400 degrees


In a micowave safe bowl melt butter and chocolate chips.

Heat until chocolate is melted and smooth, about 1 to 1 1/2 minutes on High.


Stir in cocoa until blended. 
With fork, beat in eggs, vanilla and sugar until well mixed.
Stir in flour and baking powder until well blended.


Drop by rounded tablespoons into a mini cupcake tin, greased lightly.
Bake about 10 to 12 minutes, or until tops are cracked slightly.


While still warm, press a dent in the top and let cool in pan about 5 minutes before removing.


Transfer to wire rack and let cool completely.
You could actually skip the denting and filling and just eat them as is.
Totally acceptable and yummy... but....if you want to dent and fill, please do.


Then fill with desired filling, blackberry buttercream in my case.


They look so pretty.... and taste so yummy!


If you try these, please come back and let me know what you filled them with.


Enjoy!


Baking from my heart to your kitchen,


Monday, January 9, 2012

Red Velvet Chocolate Chip Cookies

For some reason many of my friends are teachers. Maybe because my church has a school and many of them attend. For whatever reason, I love them. I love that they teach children everyday and inspire me to be a teacher to my children. Some of them probably read my blog and just have not had the chance to press the "follow" button. Ahem..... Meanwhile, I heard that there are exams this week.
So teacher friends, you know who you are,

This is a Test!

Read this post and follow the directions at the end.
Seriously, are you going to skip to the end? I didn't think so.


When I saw the idea for Red Velvet Cookies, I knew I had to try it. 

Let's get real here for a moment. Red Velvet Cake is really just a red, chocolate cake with a hint of sour, i.e. buttermilk, sour cream or yogurt. The cookie should be the same. I found a recipe on bakingserenity.com, it looked delicious, but I had to try something on my own.

Honestly, this smelled like a Red Velvet  cake while baking. Yes, I have mad smell skills, I know what it smells like. The taste, however, does not remind me of a Red Velvet cake, more like a rich chocolate explosion in my mouth.

Red.... yes.... velvety.... yes... cake... not so much, but a very delicious, rich chocolate cookie.

You will need:

3/4 cup butter
1/2 cup sugar
1/2 cup brown sugar
1 egg and 1 yolk
2 tsp vanilla
2 tsp red food coloring
1 1/2 cups flour
1 tsp baking soda
1/4 tsp salt
1/3 cup cocoa powder
1/8 cup of yogurt
1/2 cup double chocolate chips


Cream together the butter and sugars.


Sift together the dry ingredients, except the cocoa of course.


I added the red food coloring to the cocoa powder. I must admit though, I added a bit more coloring than I should have. I wanted a rich red color, but I think I got maroon.


Add the egg and yolk, then the vanilla. Add the cocoa mix and gradually add the flour mixture.


I wanted to have the tang of the red velvet cake so I added some plain yogurt.


Stir in the chocolate chips. I prefer double chocolate. The more chocolate the better.


Scoop them onto a cookie tray.
I ran out of parchment paper, scandalous, I know, but I had some non-stick Reynolds wrap. 


Bake at 375 degrees for 10-12 minutes.


I may have eaten one or three of these immediately for.. ahem... research purposes.

I am definitely going to have to get these out of my house and soon.

I am going to take these to Mrs. Braswell tomorrow sometime. If you want one, you will have to see her.

The test is to come back and tell me how you like them and any requests for a future blog post.
If you happen to join and follow my blog, well that would be Awesome!

Oh and I also know alot of students.... I guess we will see who gets to the cookies first. As far as I'm concerned, if you read this blog, I love you and you deserve a cookie.

Game on!

p.s. Jessica and Nicole, I love you for posting comments on my blog, so I have put a few aside for you. ;)

p.s.s. For those who have posted comments and don't live near me, please know that I love you too. If you lived closer I would put some aside for you too.


Baking from my heart to your kitchen,