Thursday, March 29, 2012

Pastel Coconut Cupcakes and Marshmallow Frosting

I love Easter.


I think it is right up there with Christmas for me.


I love all the pastel colors and pretty dresses. I have three boys so the only pretty dress will be on me, but I am ok with that. They have some stylin clothes for boys now and they will be adorable.


I also love that the weather is getting warmer and everything is blooming around me. 


We had an Easter playdate around these parts and it was so much fun. We had an Easter egg hunt and those little rascals found the eggs so fast. One of my friends graciously opened her house to all of us and there were kiddos everywhere. I was going to plan other activities, but they all had so much fun just playing. It was glorious actually. There was no fighting and as far as I know no "boo boos". The weather was perfect and we just had a great time.


I of course brought something sweet, really, it is just expected of me now. I must say, I don't mind at all. I love it.


It was a warm day so the marshmallow frosting decided to melt all over my cupcake.
The important part was that they were still yummy.


I used a really simple recipe with a box this time. I know *gasp* but sometimes it just works. Don't judge me, you know boxed white cake is delicious. You will also want to make these, trust me.


You will need:

Pastel Coconut Cupcakes

1 box white cake mix
1 (8.5 oz) can cream of coconut
1 package vanilla instant pudding 
1/3 cup vegetable oil
1/4 cup water
4 large eggs

Preheat oven to 350 degrees
Blend all ingredients with an electric mixer on low speed for 1 minute.
Stop and scrape down the sides.
 Increase the mixer to medium and beat for 2 minutes more, scraping the sides down again if needed. The batter should look thick and smooth.


Divide the batter into four equal parts and dye pastel colors.


Drop colors in one at a time. So pretty.


Bake for 15-20 minutes. Let cool on rack.

Let's talk frosting!

Pastel Marshmallow Frosting
1/2 cup sugar
2 Tbls water
2 large egg whites
1 jar (7oz: 1 1/2 cups) marshmallow creme

Place the sugar, water, and egg whites in a medium-size heavy saucepan.


Cook over low heat, beating continuously with an electric hand mixer on hight speed until soft peaks form, 3-4 minutes. Please be careful... don't melt your cord on the burner.

 
Soft peaks! Remove the pan from the heat.


Add the marshmallow creme and beat the mixture with the mixer on hight speed until stiff peaks from, about 2 minutes more.

The recipe said to use at once, but I regridgerated it overnight. That might have been my downfall and why it melted so easily. Note to self... Use at Once!


They were still quite tasty and the marshmallow frosting complimented the coconut cupcake well. Want to see the inside? I know  you do....


The one on the left I put the batter in side by side.

On the right I placed the batter on top of each other.

Pretty!


They made a pretty pastel display!
They just make me happy, even if they did melt.
Oh and we will talk about those cookies next week.
Something to look forward to!


Baking from my heart to your kitchen,


Tuesday, March 27, 2012

Chocolate Coconut m&m Sugar Cookies

Why?


My almost 3 year old's favorite word right now. If you are past this point in your child's life. God Bless You! You feel my pain.


I answer the first round of "Why's" with a patient answer. 


Wash your hands.... Why?... Because you just stuck your hand in the toilet..... Ok


Please don't jump off the couch.... Why? ..... Because you can hurt yourself.... ok


Please don't color on the wall..... Why? .... Because you color on paper not on the walls.... ok


Now fast forward to lunch time. I have gone half the day answering why after why......


Please don't dump your food on the floor.... Why? (As he continues dumping)....... 


At this point my friends I can feel my nerves slowly unraveling... the inevitable "Because I said so" is coming soon. Deep breaths.... deep breaths.....


So when my husband walks in and asks, "Why are you making those cookies right now?" The poor man didn't know I had reached my quota of "whys" for the day. I ever so kindly responded, "Because I want to!"
I love that man, he understood and just backed out of the kitchen, no further explanation was needed.


You will need:

(This is really the only one you need)
Coconut m&m's

Make the Cookies according to directions.
Cut in cute little shapes.
Press m&m's in center.
Bake.
Eat.


They are best when they are right out of the oven and the m&m is soft, but they are still tasty the next day too. At least I think so. It is chocolate goodness with a hint of coconut.
Simple, yet delicious.
Why?
Because sometimes you just need a cookie.


Baking from my heart to your kitchen,


Thursday, March 22, 2012

Rolo Blondies

I am going to bring you a little reality. 


Stress Happens!


It's everywhere, no one can hide from it. You can try, but it lurks around every well intentioned corner waiting to strike. Such an instance happened to me this week. I had volunteered to make a dessert for our Missions Conference at our church this week. As far as I knew, I had signed up for Friday.
I planned it out, had the perfect dessert, went to the store, bought all the ingredients I didn't have and I was ahead of the game. Oh yes, I was prepared.


Then Wednesday, stress struck! One of my friends called to ask me where we were to deliver our desserts  that night. Silly girl, the desserts are for Friday. She insisted it was that night and it had to be there by noon. I glanced at the clock.... 11:50. Great! She must be wrong. I called the church secretary and asked what I had signed up for. That night! Well fantastic, now what?
There was no time to make what I had intended for Friday. I told her I would get my dessert there a little late, whatever it was going to be. 


I had just bought some Rolo's. The new bag, the one that is already unwrapped and ready for consumption. I was fully intending to eat those in a chocolate crisis. I then remembered a cookie post I had seen on cookiesandcups.com using Rolo's and pretzels. I didn't even have time to make a bunch of cookies. I had to go with a bar. Here is what happened!

Sometimes stress can be manipulated into deliciousness, such as these gems. They were so good.
I didn't want them to leave.
Like a good volunteer, I cut them up and sent them on their way, still warm, to tempt others with their gooey, chewy goodness.

You will need:

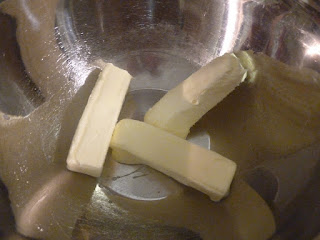
2 sticks butter, melted
 2 cups brown sugar
 2 large eggs
 2 teaspoons vanilla extract
Pinch salt
 2 cups all-purpose flour
prepackaged Rolo's
Caramel Sauce (I used Hershey's since I was pressed for time)
pretzels, crushed

Butter or line a 9x13 pan
Mix melted butter with brown sugar – beat until smooth. Beat in egg and then vanilla.
Add salt, stir in flour.


Pour 1/2 the batter into prepared pan.


Press in the Rolo's and drizzle with Caramel Sauce.


Sprinkle on the crushed pretzels. How ever many look right to you. Enough to cover.


Drop on the remaining batter in three places and smooth out at best you can. 
Just for the fun of it, sprinkle on some chocolate chips.

Bake at 350°F 25-30 minutes, or until set in the middle.
 Cool on rack before cutting them. 


Enjoy!
They were chewy and rich,  with a hint of the salty pretzel. 
I must make these again soon!
Definitely a stress reliever.


Baking from my heart to your kitchen,


Monday, March 19, 2012

Carrot Cake and Cupcakes


It has finally happened.
My son has done something I completely don't understand.
There are so many crazy things that fly into his head that I just check them off as, "he is just being a boy". Jumping on the bed...check. Stomping through puddles...check. Throwing rocks...check. Fighting with his brother...check. But this... I just don't understand.


We step out into the backyard and I see these beads buried in the dirt. I have no idea where they came from. My first thought was, which necklace did they break and try to bury it outside. Treasure, you know, again, I would understand that. I ask my 5 year old son about them, he doesn't know, so I hand them to him and off he goes. He runs to me a few minutes later and says, "Uh-oh Mommy", never a good sentence. He puts his head back, points to his nose and I see a bead lodged in his nostril! Are you kidding me?! 
Why is it that he would think the logical place to put a marble size bead is ... Up Your Nose!! 
I did what any good mom would do...Panic! I saw us driving to the ER, me explaining about the bead up the nose, waiting there for hours while they disuss the options and snicker at us. Good thing I was able to get it out, but then I thought, wait... there were two. He points to his other nostril. Ugh.. I thought for sure we were headed to the ER now, this one was pushed up there so far it was for sure in his brain. I have heard of such stories, but my son would never.... well, until now of course. 
Thankfully, after some pushing and prodding I got that thing out. No one was going to snicker at me today, well, except for my friend who witnessed the whole thing. My son was then warned that it is NEVER ok to put things up your nose. EVER!


I just don't understand, but what I do understand is cake. Let's talk about cake and any cake that uses 3 sticks of butter is a winner in my book.


I have posted about Carrot Cake before, but I didn't include pictures and adorable cupcakes, so I thought it was worth revisiting.


Carrot Cake
Adapted from FoodNetwork.com Emeril Lagasse


3 sticks, plus 1 tablespoon unsalted butter
2 cups granulated sugar
2 cups all-purpose flour
2 teaspoons baking soda
2 teaspoons ground cinnamon
1 teaspoon salt
4 large eggs
1 teaspoon pure vanilla extract
3 cups grated carrots

Cream Cheese Frosting

20 ounces cream cheese
2 stick unsalted butter
5-6 cups confectioners' sugar
2 teaspoon pure vanilla extract
1/2 cup chopped toasted pecans


Preheat the oven to 350 degrees F.

Shred the carrots, I used about 6 carrots.


Butter 3 (9-inch) cake pans with 1 tablespoon of the butter and set aside. In a large bowl, cream the butter with an electric mixer. Add the sugar, and beat.


In a medium bowl, combine the flour, baking soda, cinnamon, and salt, and mix well.


Add the dry ingredients, alternating with the eggs, beating well after the addition of each. Add the vanilla extract and mix.
Add the carrots and beat on medium speed until well incorporated, about 2 minutes. 
Divide between the 3 cake pans and bake until set and a cake tester inserted into the middle comes out clean, 25 to 30 minutes. Remove from the oven and let rest in the cake pans for 10 minutes. Invert onto wire racks, remove from the pans, and let cool.
For the mini cupcakes, bake 10 minutes.
For the Frosting: In a large bowl, cream together the cream cheese and butter until light and fluffy. Add the sugar gradually, beating constantly. Add the vanilla, mix to combine


A few tips for putting this cake together:
Refrigerate the cake layers before icing, they are a bit fragile and do better cold.
Also refrigerate the frosting, it is creamy and smooth and will frost easier when it is cold.
When the frosting starts to come to room temperature it starts to melt to the bottom of the cake. I believe it is because I prefer a more tangy cream cheese frosting. If you know how I can get a stiffer cc frosting, please share. I would love to know, seriously.
I generally just prefer this cake cold, I don't know why, but I think it tastes better.

I tint some of the frosting orange and some green to pipe on the top carrots. Easy peasy.


Oh and I thought these mini cupcakes looked adorable in my tea light holder. 
Definitely going to be using as a display in the near future.


My sons loved it! To me, that is the best part.
Hopefully, they will stuff them in their mouth and not their nose... sigh.


Baking from my heart to your kitchen,


Wednesday, March 14, 2012

White Cake with Lemony Buttercream

Spring is in the air! I love everything about spring.... well, except for the allergies. Everything else, totally love.

I needed to make a spring cake!  No reason. I just needed a cheery cake on my table.
I have seen alot of rainbow themed treats floating around because of St. Patrick's day and such, which made me have rainbows on my mind.
Spring, rainbows, flowers and green... that is what's on my mind. 


Here are my spring inspired flower thoughts!


Here is where the rainbow inspired thoughts came in.


Don't worry, the green thoughts are coming... let's talk white cake.
I usually make my white cake from a mix *gasp* , but I have been searching for a worthy homemade recipe. I normally use a box because homemade white cakes tend to be dry and not fluffy.
I think my search is over or at least I am super close. It is from iambaker.net, she is very talented, go on over and check her blog out. I slightly changed her white cake, but only with the flavoring.

Here is what you will need:

2 large eggs separated

1 3/4 cups sifted cake flour

2 tsps baking powder

1/4 tsp salt

1/2 cup room temperature butter

1 cup sugar

1 tsp vanilla extract

1/2 cup milk

1/8 tsp cream of tartar

Separate the eggs, placing the whites into one container and the yolks into another. Let come to room temperature.

Preheat oven to 350 degrees. Line your cake pans. I used 3 8inch pans.


Sift flour, baking powder, and salt into a bowl and set aside.


Using an electric mixer,  beat the butter until soft and creamy, about 1 minute. Add 3/4 cup of sugar (reserving the rest) and beat for an additional 2 minutes. Now add egg yolks, one at a time, until completely incorporated. Add vanilla until combined, about 30 seconds.


Now you are going to add your flour mixture and milk. Starting with the flour, add 1/3 of the mixture and mix until incorporated. Now add 1/2 milk mixture, mix until combined. Add half the remaining flour, combine. Now add the rest of your milk and combine. Add remaining 1/3 of your flour mixture, (always start and end with the flour mix) and go ahead and mix until combined. This whole process should take less then 2 minutes, it is important, you do not want to over beat the batter.


In a separate clean bowl with clean whisk attachment, whip eggs whites until foamy then add the cream of tartar. (I did this on medium speed) Beat until soft peaks occur, and then gradually add in your remaining sugar.  The picture above is almost there.


You will want stiff peaks, which took me about 3 minutes. Picture above is the right stiffness. Now, take your rubber spatula and fold your eggs whites into your cake batter. Make sure they are fully incorporated, but do not over stir the batter, as you do not want to eggs to deflate.


Here is where green thoughts came in. My son loves green and with St. Patty's day around the corner... I thought...why not. He was thrilled!

Put batter into prepared pans and bake for 20-25 minutes.
My cake took 15-20 minutes. Maybe it was the green.

I filled it with strawberry Swiss Meringue Buttercream (which we will not discuss, I am still mastering that, haven't quite made it properly yet) and covered it with my favorite
Lemony Buttercream. Recipe to follow.

Here is a slice of green for you!


I hope I have made you think of spring, rainbows, flowers and well, green! 


Lemony Buttercream
 
1 cup butter, softened
1/2 cup shortening
2 tsp. lemon zest
3 Tbls lemon juice
3 cups powdered sugar

Cream butter, shortening, zest and juice.
Slowly add powdered sugar.
Beat until smooth and creamy


I also entered this cake on Crafty Friday on Kitchenfunwithmy3sons..Here.... go on over and check it out.  Her blog is fantastic.


Baking from my heart to your kitchen,


Friday, March 9, 2012

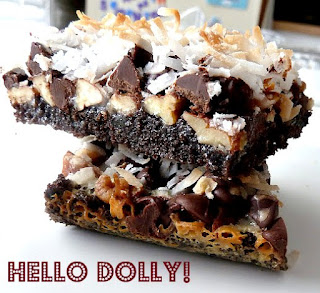
Hello Dolly and a little history


When I was younger I worked at a bakery counter and they had these delicious treats called "Hello Dollies". I never questioned the name, they were delicious and that is really all that mattered. I had forgotten about them until I came across a recipe while looking for something else entirely. I knew I needed to make them,  now they were back in my head and would not get out. I even made a special trip to the store to get coconut.

Then I started to wonder, why Hello Dolly? Apparently alot of other people out in blog land wondered too, I found a ton of variations and speculation. I wanted answers! I kept digging. I finally found the answer I was looking for on cabingoddess.com. She had a picture of a recipe card written by her grandmother, I knew I was on to something. She had the same information I had read on others blogs but she took it a step further. Here is what she found.
"The recipe became famous during the 60′s when Hello Dolly was on Broadway. During the show, there is a restaurant scene. Clementine Paddleford’s (our countries first food journalist, the original foodie!) food column in “The Week “ magazine on September 19, 1965 featured a “Hello Dolly Cake” which an 11 year old girl borrowed from her grandmother. The recipe included graham crack crumbs, flaked coconut, chocolate chips, chopped nuts, and condensed milk.


Here is the article, love that she had this on her blog, this is what I was looking for:

19 September 1965, Syracuse (NY) Post-Standard, “Clementine Paddleford Recipe Swap,” This Week magazine, pg. 20, col. 2: “Hello Dolly” Cake: ALECIA LEIGH COUCH OF DALLAS, TEXAS, 11, is today’s youngest. She sends a cake recipe borrowed from her grandmother, who cooks young, too. The “Hello Dolly” name was Alecia’s idea. “No need even to mess us a bowl,” Alecia writes, “and that’s the big reason why I call this my favorite cake recipe. And of course it’s good!”


However, I also found that on July 22, 1965, the Ada (OK) Evening News had published a similar recipe for “Hello Dolly Cookies.” So no one knows where the original recipe came from, maybe the back of a sweetened condensed milk can. It also has many different names.... Magic bars, 7-layer bars.... on and on. I've never seen one cookie have so many different names. One thing remains the same, they are delicious and you must try them!


Mystery solved... we may not know the origin of the bar, but at least we figured out how they came by the "Hello Dolly" name.

Here is how I made mine:


You will need:
3 cups Chocolate Graham Crackers
1 1/2 sticks butter, melted
1 cup nuts (I used walnuts)
1 cup chocolate chips
1 can (14oz) of sweetened condensed milk
1 1/2 cups coconut

Preheat oven to 375 degrees


Crush the graham crackers I and melt the butter. Mix together.


Line a 9x13 pan with parchment and press the graham cracker butter mix onto the bottom of the pan. Bake for 20 minutes, rotating once. Let cool.


Once cooled sprinkle on the nuts.


Add the chocolate chips.


Next, pour on the sweetened condensed milk.


Lastly, sprinkle on the coconut.
Bake for 10-15 minutes until coconut is toasted.

Let cool, or if your like me, grab a knife and fork and dig in.


Yum!


Baking from my heart to your kitchen,